How to Create Natural Shadow in Photoshop 2022 [step by step process]
Shadow can be created on photographs by photoshop, so a few photographers or retouchers didn’t give it much importance. But the fact is are those shadows looking natural or not.
Shadows can have a significant impact on your online business, according to various studies. For a long time, top online markets used unique ideas and elements in their product photos to push their business.
As an owner of an eCommerce business or a clipping path service provider, you must know how to create natural shadows in photoshop.
In this article, our photoshop experts are going to tell you the steps of adding natural shadows in photoshop.
Creating natural shadows in photoshop: What are the processes?
Contents
Shadows in eCommerce photographs can help products pop up on the page. It will push the product into customers’ shopping baskets. It simply takes a few minutes in Photoshop, and there’s no need for any complex or costly lighting.
Photographs with realistic shadows around objects look more skilled and realistic. Unfortunately, you might not be able to take photos in the ideal settings or with the right lighting to get the shadows you want. So, a few techniques can help one out.
There are two kinds of shadows on objects: cast shadows and form shadows. The direction, distance, and quantity of light sources produce both forms of shadows. One can use the object’s form shadows to get a concept of what a realistic cast shadow looks like.
The distinction between a cast shadow and a drop shadow
Making a realistic shadow is far more difficult and gratifying than simply applying a drop shadow to an item. Drop shadows are typically the same size and dimension as the object on their own.
In actual life, a shadow that looks exactly like a real drop shadow is very rare. To make your shadow look genuine, you must adjust it into a three-dimensional cast shadow using the method explained above.
To create natural shadow in photoshop a few steps need to follow: Please Make the step images
Step 1- Separate your subject from the background
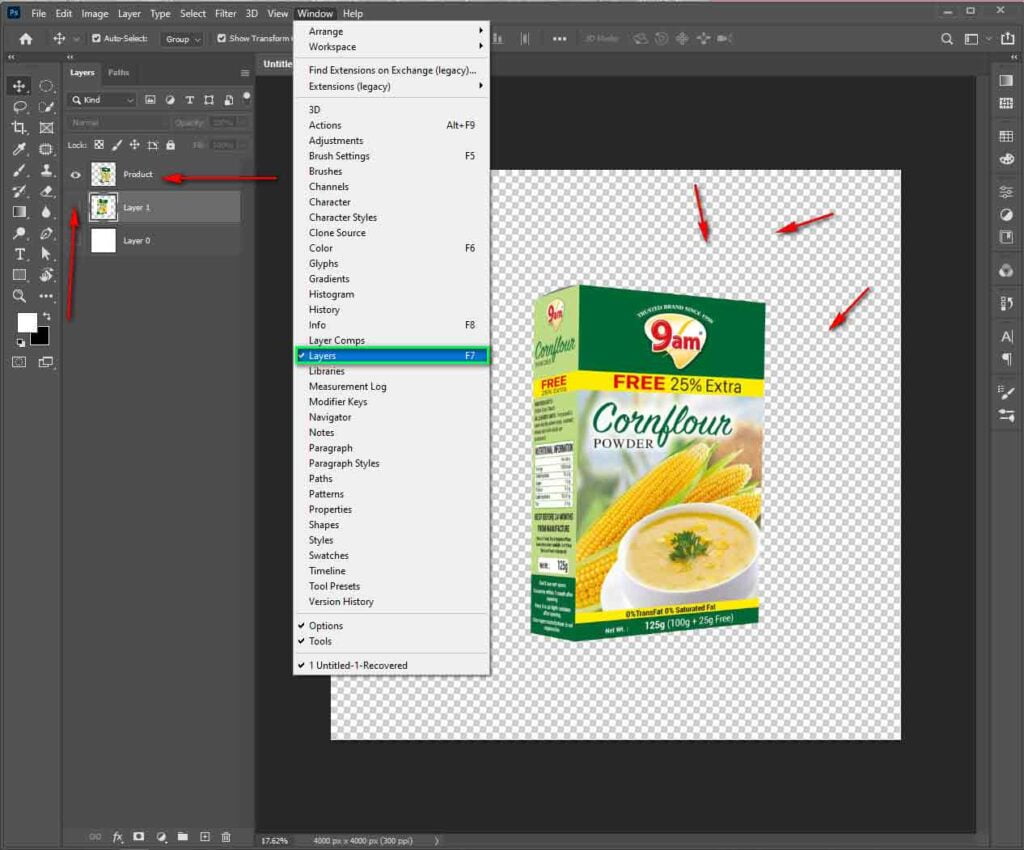
Open the image you want to change. Go to Window and then layers to open your layers palette. When editor in the new file. He should remove the object from the shot and move it to a new layer. To avoid any confusion with other layers while constructing shadows, give a new layer with a name that will make sure the background has been removed.
To make the background layer invisible, click on the eye icon next. It will allow the editor to see the object has just been added to a transparent background.
Step 2: Replace the background behind the isolated object with a new one
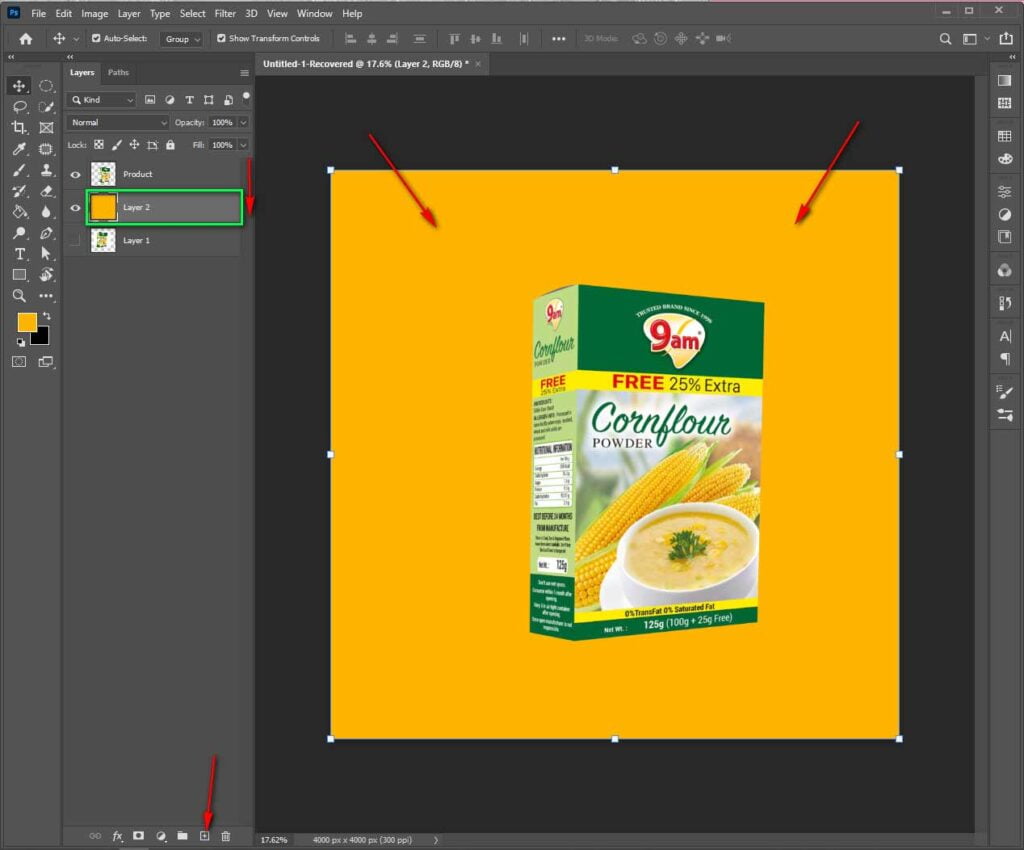
Select your hidden background layer in the Layers palette. To create a new layer, go to Layer > New Layer or press SHIFT+CONTROL+N (SHIFT+COMMAND+N on a Mac). This layer will be the new background for the project.
Go to Edit > Fill to add color to the new layer. You can select a customized color from the dropdown menu by selecting different Colors.
Step 3: Pick a color for your cast shadows
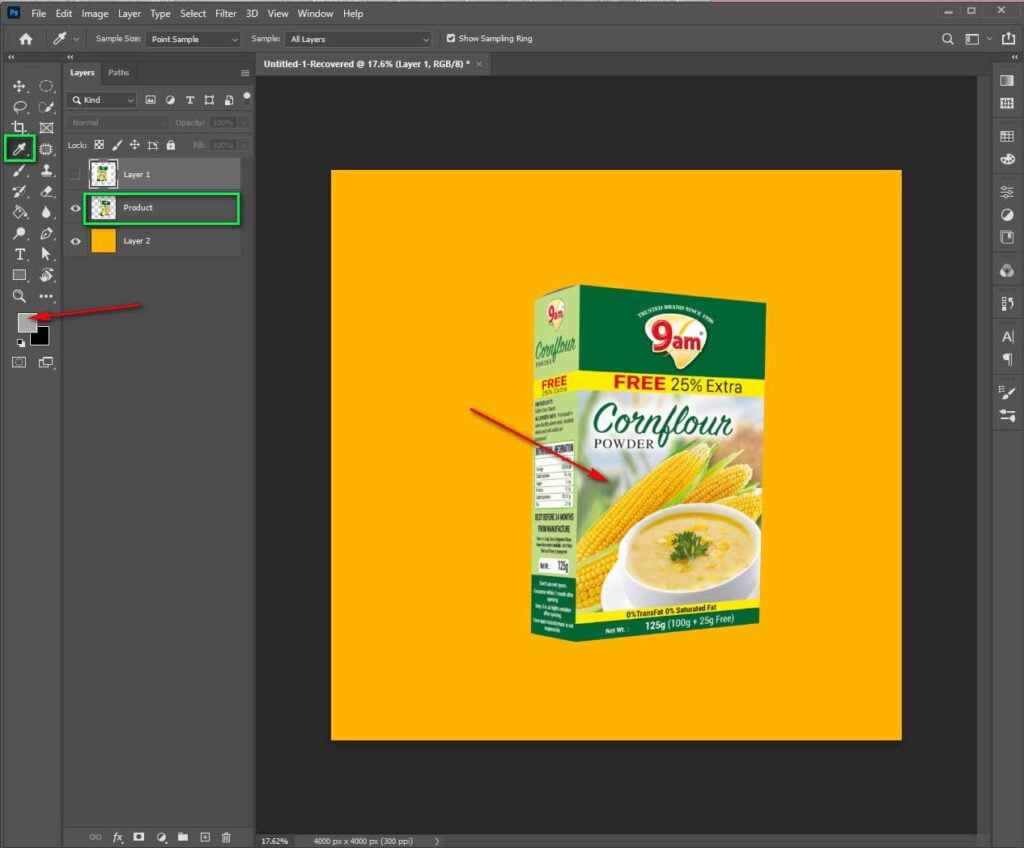
Shadows contain color, so you can identify the color of your cast shadow by looking at the form of shadows on the object.
Choose a form shadow within the item and select it using the eyedropper tool.
At the bottom of the Tools palette, the selected color will display as the foreground color. To open the Color Picker modification dialog box, double-click on the desired foreground color.
Step 4: Add a drop shadow to your image
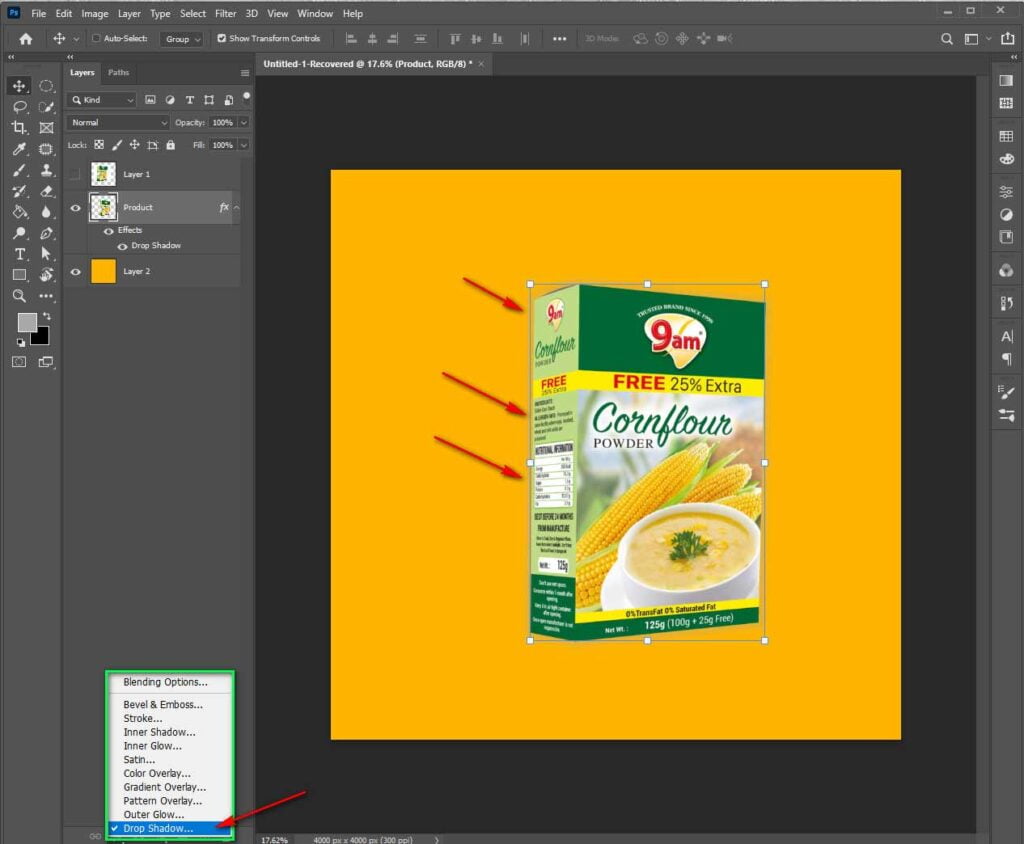
Choose the separated item layer and then pick Drop Shadow from the fx button at the bottom of the layers menu.
Step 5: Make a layer out of the drop shadow
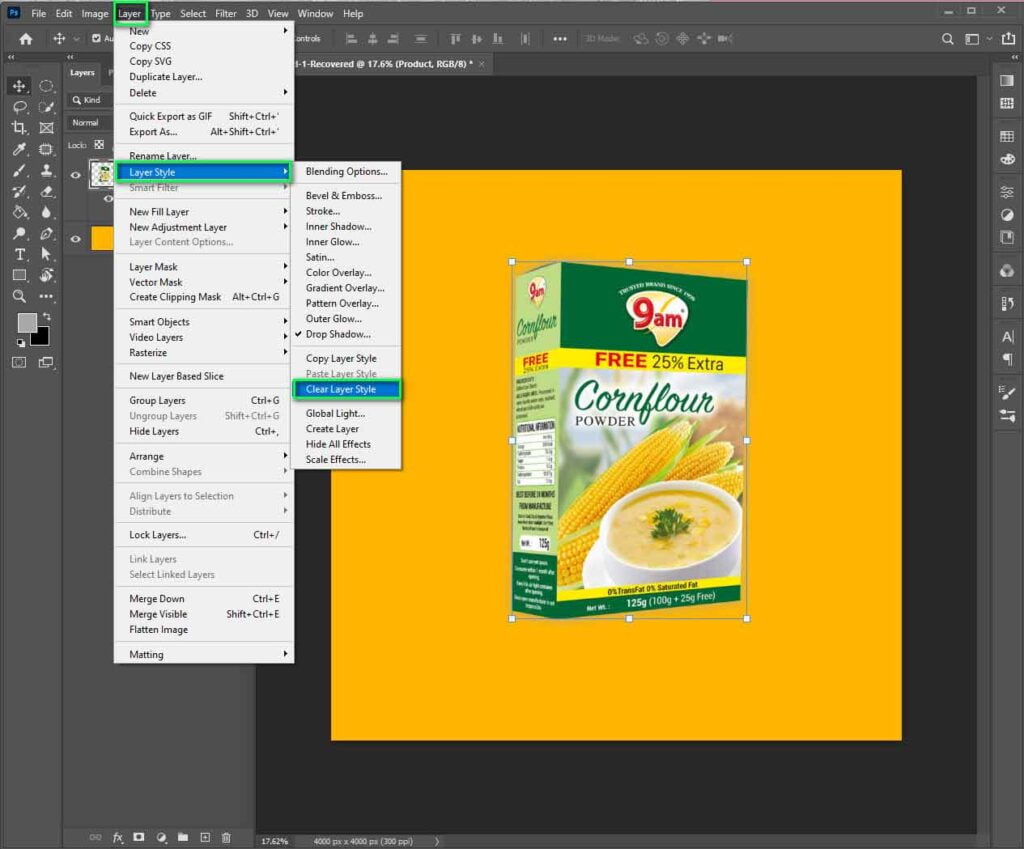
To split the drop shadow from its layer, go to Layer > Layer Style > Create Layer. This will allow users to change the shadow without having to change the item. If one warning dialog box appears, then try to build the layer, try to click OK.
Step 6: Change the drop shadow’s appearance
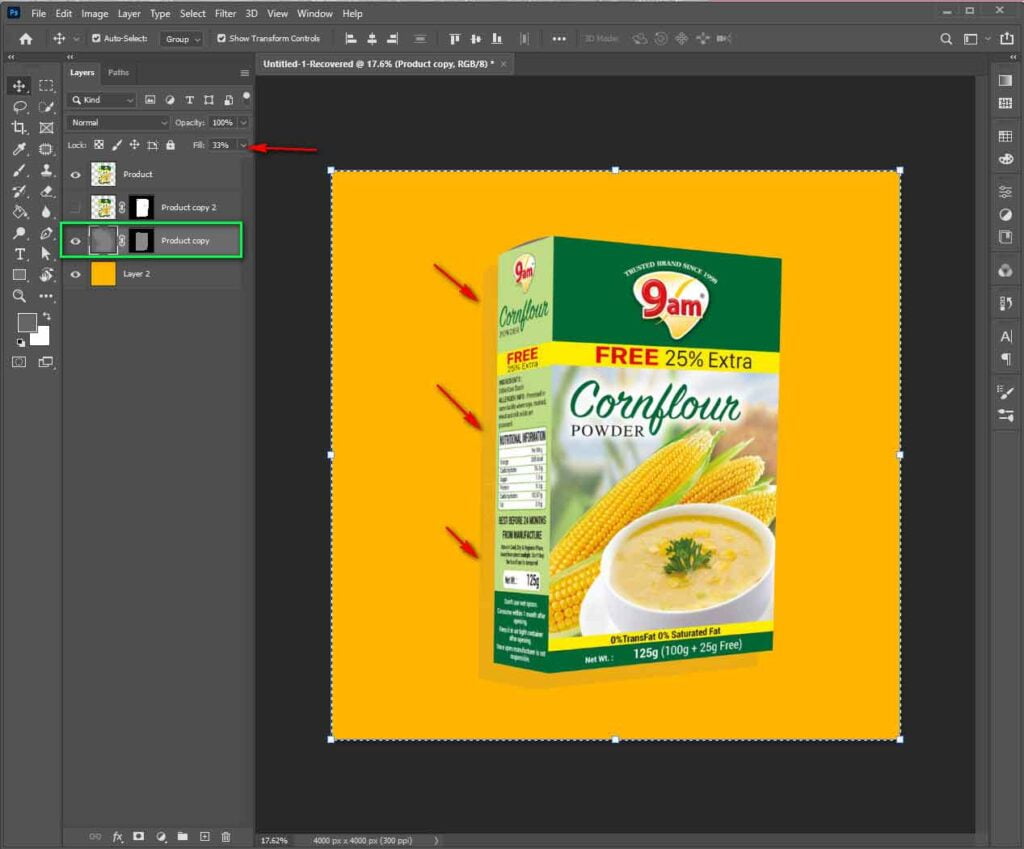
Select the new production drop shadow layer in the layers palette. To make a drop shadow fall to the ground, go over to Edit then transform, and next distort. Recognize where the form shadows will fall naturally on the object. This will decide which angle will be the best for the vanishing point of the image.
One can choose specific elements of the shadow and change them separately if needed to guarantee the shadow connects to all areas of the item that touches the ground.
Adjust the Blending Mode of the shadow layer to Normal and fill it to 100%.
To use the formed primarily Tool, make a selection around the part of your shadow you want to change, and then go to Edit and transform, then distort to change it.
And lastly, do the alteration and then use the Paintbrush and Eraser tools to “repair” any shadow edges after the adjustments. Then switch the drop shadow layer’s Layer Blend Mode back to Multiply and decrease the Fill to 75%.
Step 7: Add an alpha channel to your project
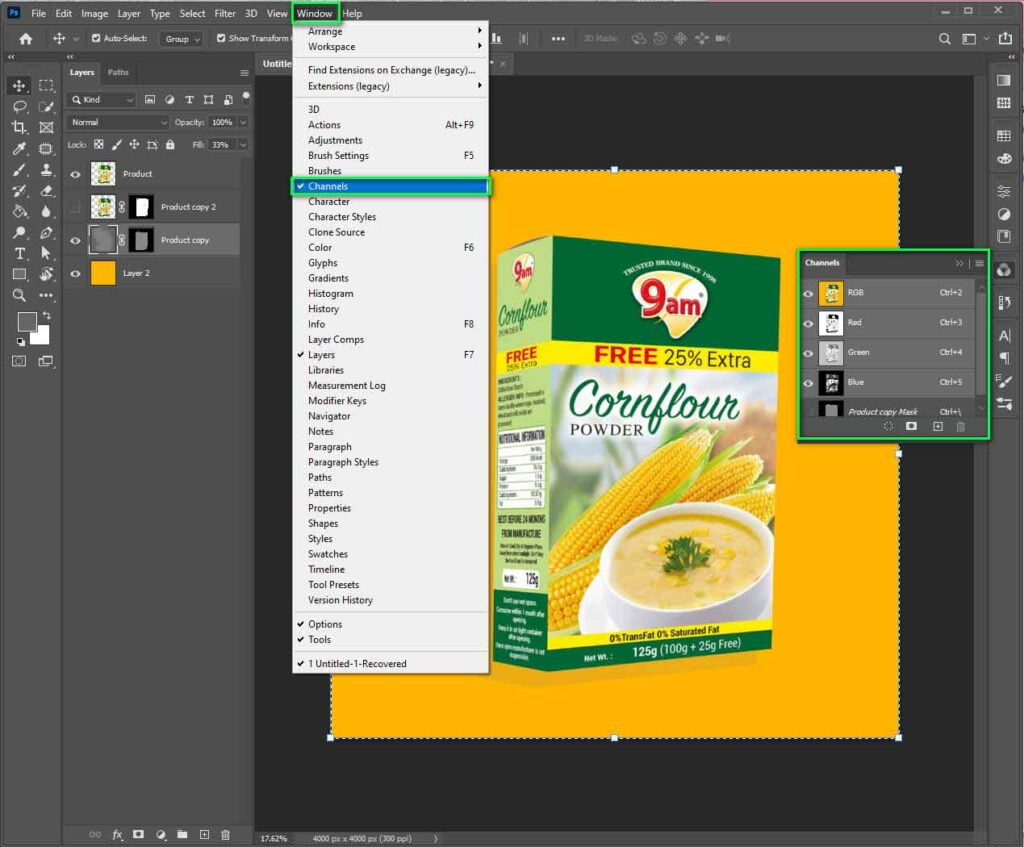
The shadow is beginning to look real, but keep in mind that shades in real life become slightly blurry and brighter as they move from the object. Using an alpha channel to regulate the portions of the shadow that really need to be blurred and lightened is a simple approach to accomplish it.
To make an alpha channel, access your Channels Palette by going to Window > Channels and Selecting New Channel from the Palette menu.
A dialog box for creating a new channel will appear. One can use the default name of Alpha 1. Ensure the Selected Area radio button is set under Color Indications.
Step 8: In your alpha channel, make a pattern
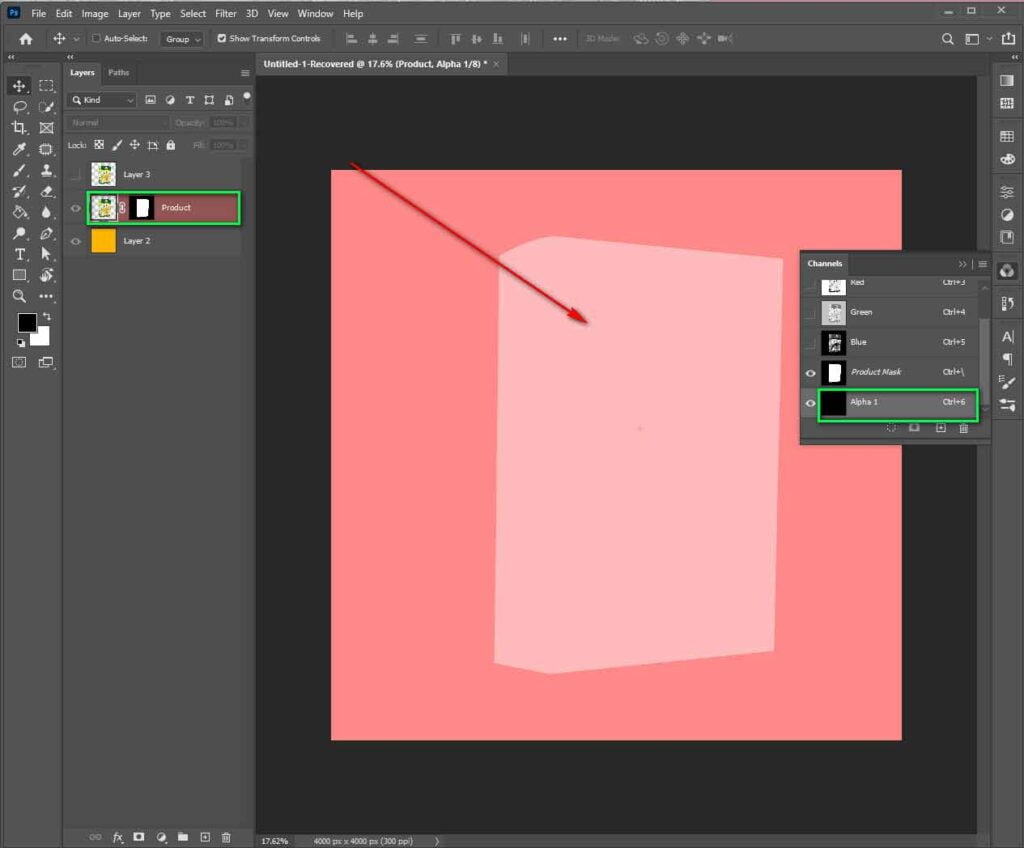
Choose a new Alpha 1 channel in the Channels palette. Make all channels visibility by turning it on.
From the Tools palette, choose the Gradient Tool. Keep in mind the background is black and the backdrop is white at the bottom of the Tools palette.
Set the cursor at the farthest point of the shadow, and draw the gradient toward the portion. Whenever the gradient parameters are perfect.
Step 9: Blur the selected area
Here, the user will see a red gradient on top of the image once they build the gradient in the alpha channel. Illustrating how the mask within the channel interacts with your image. The eye icon next to Alpha 1 can be toggled to make the red gradient invisible so it isn’t distracting.
To choose your color channels and deselect your alpha channel, click the top channel in your Channels palette.
In the layers palette, ensure the drop shadow layer has still been selected.
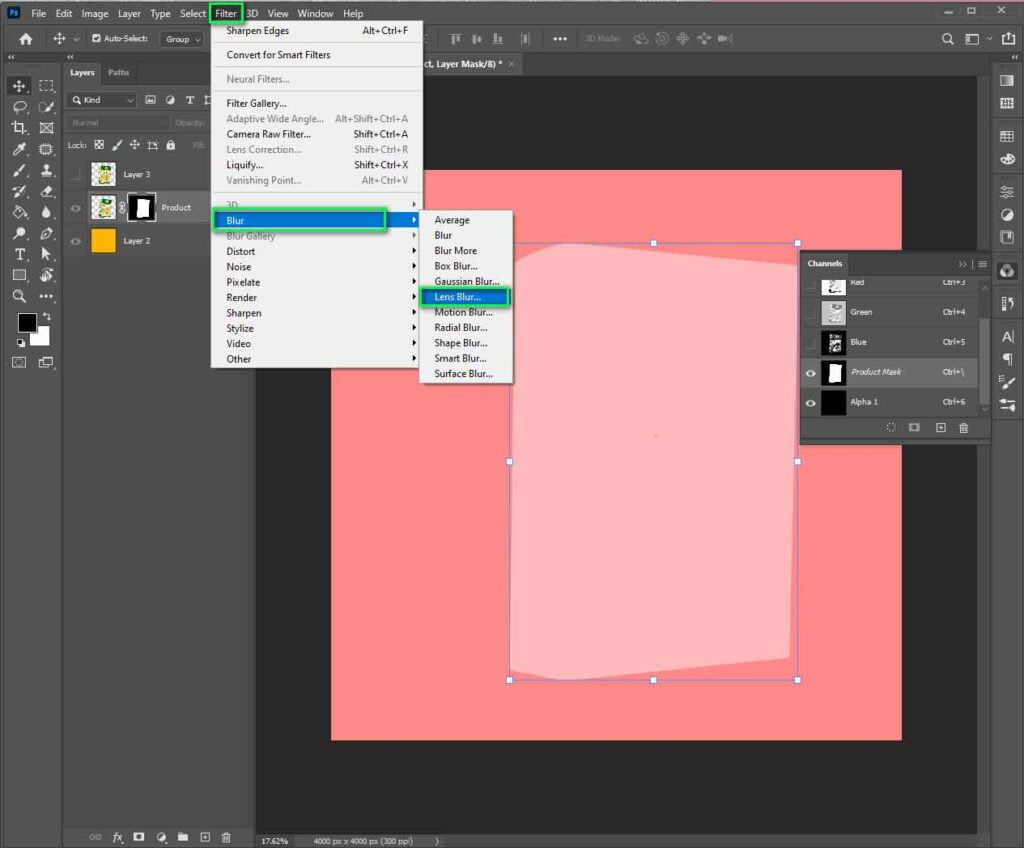
Select Filter, Blur, and Lens Blur from the Filter menu. A dialog box will appear, allowing you to make considerable adjustments to your blur.
Select Alpha 1 from the Source drop-down box under Depth Map.
Maintain the Blur Focal Distance at 0.
Set the Radius to a large value. All other options should be left alone. If all is set then click the OK button.
Step 10: Make a layer mask
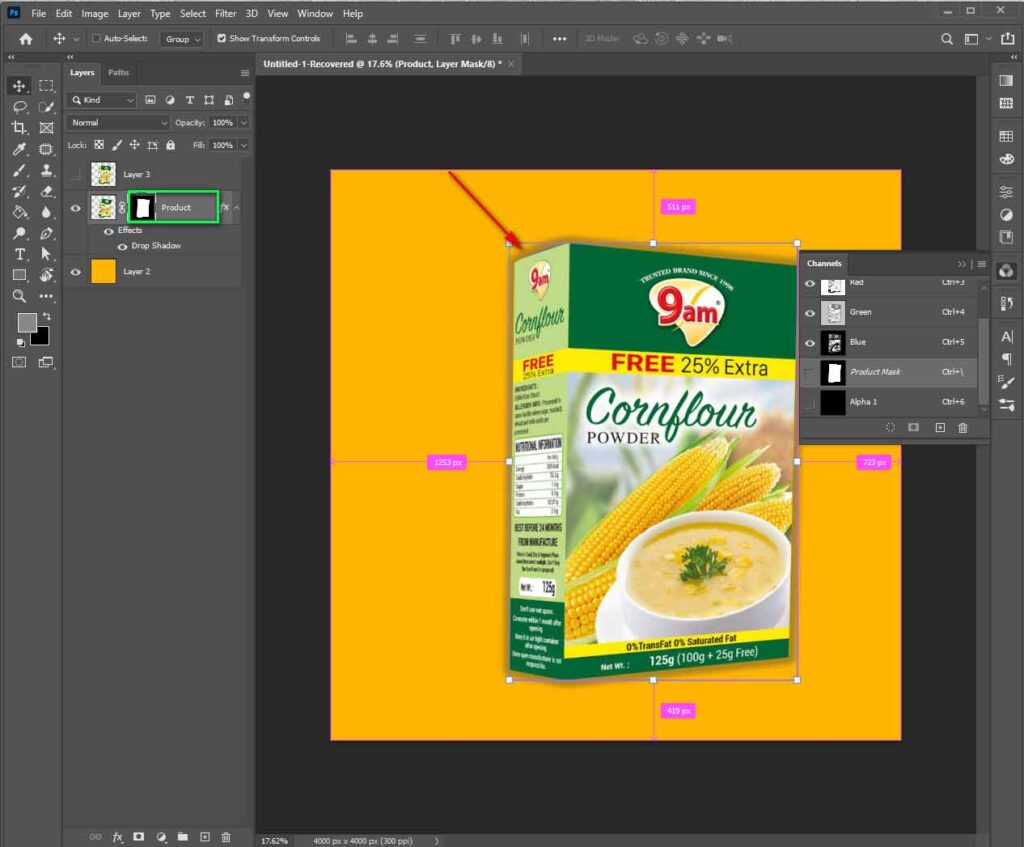
Choose load selection from the menu bar. Pick Alpha 1 from the Channel drop-down menu, then tick the radio button next to New Selection. And click the OK button.
Now, Individuals should now see a selection that directly relates to the darkest areas of the gradient, that has been created in the alpha channel.
Then, select the inverse by pressing SHIFT+CONTROL+I (SHIFT+COMMAND+I on a Mac) or by entering SHIFT+CONTROL+I.
Click the Layer Mask icon in the Layers palette at the bottom of the palette.
The shadow will appear to “fade” as it recedes into the distance once the mask is applied.
Step 11: Take into account the light source and eliminate shadows
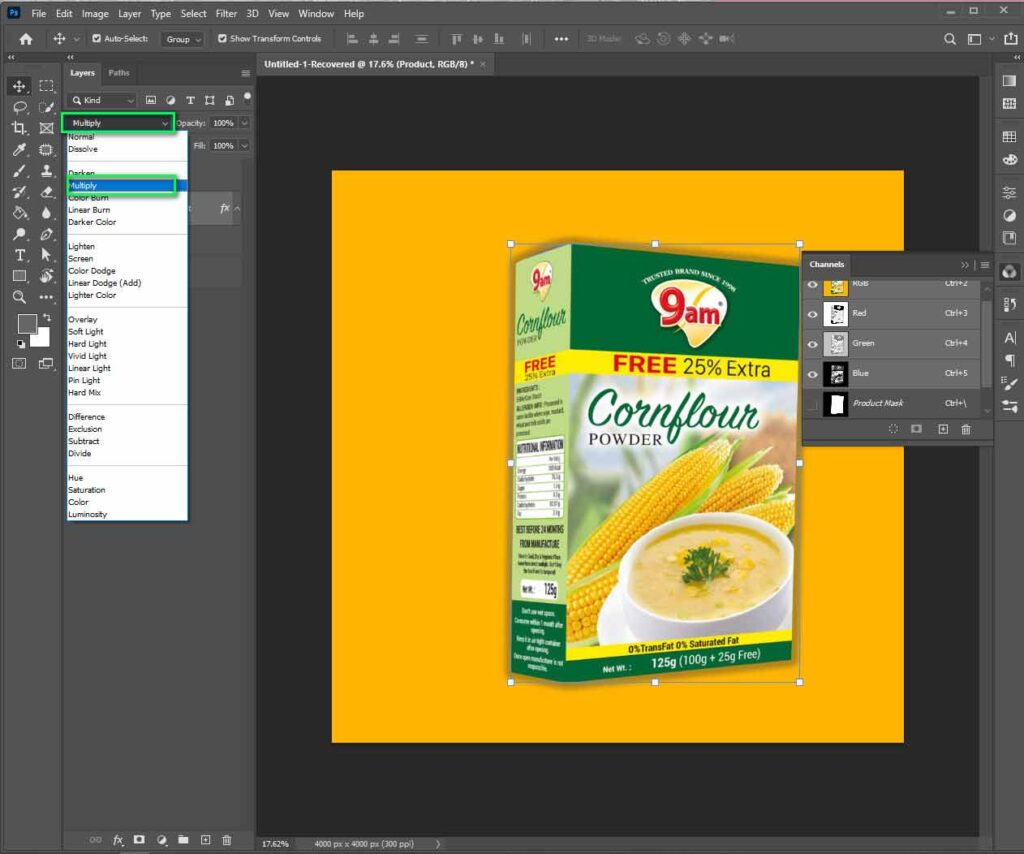
Finally, double-check that no parts of your shadow are cast on the wrong side of your object. Because the light source moves the cast shadow behind the object, there should be no instances of the shadow appearing in front of the object in the example in this tutorial. Remove any shadows that don’t belong with the Eraser Tool.
The simplest technique to recreate these shadows is to create a new layer above any object and then use the brush tool to paint in the shadows cast by using shadow color. Adjust the brightness of the Layer Blend Mode to Multiply till it matches the underlying shadows.
Variations in shadows
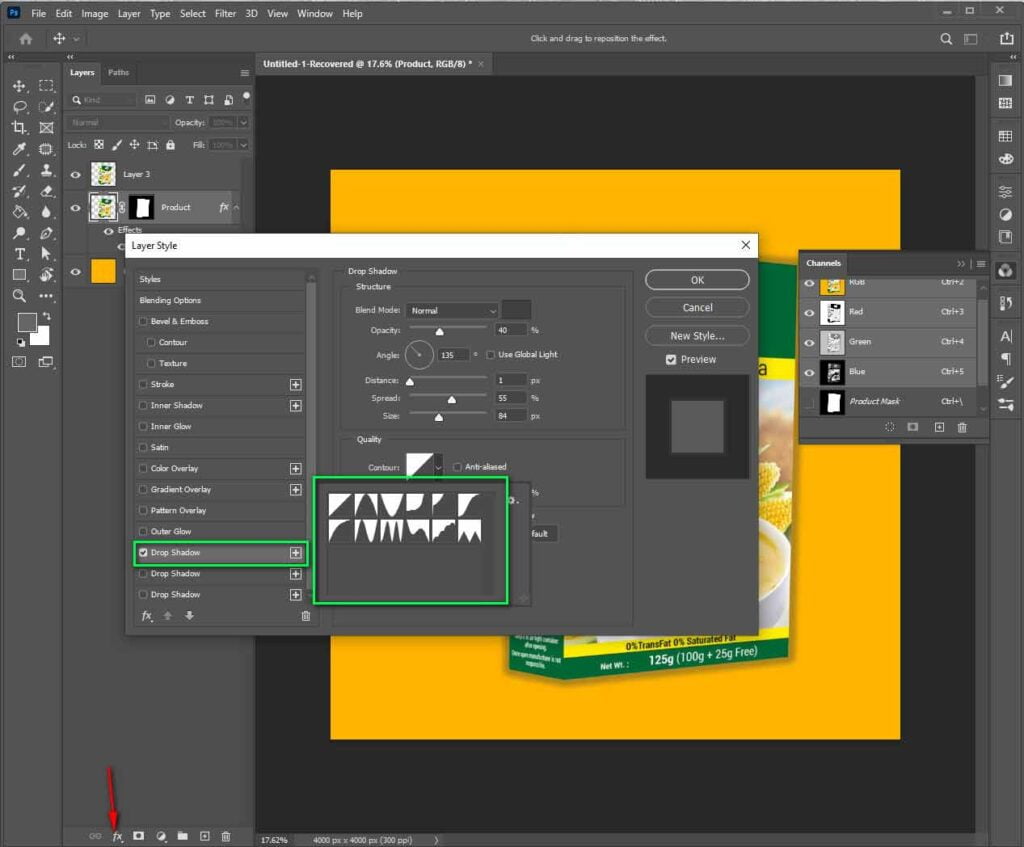
If you’re putting your object into a different shot, it might need to add more cast shadows to match the other shadows in the new scene. After finishing the first cast shadow, follow methods of adding shadows in different directions to simulate more light sources.
Importance of drop shadow In eCommerce
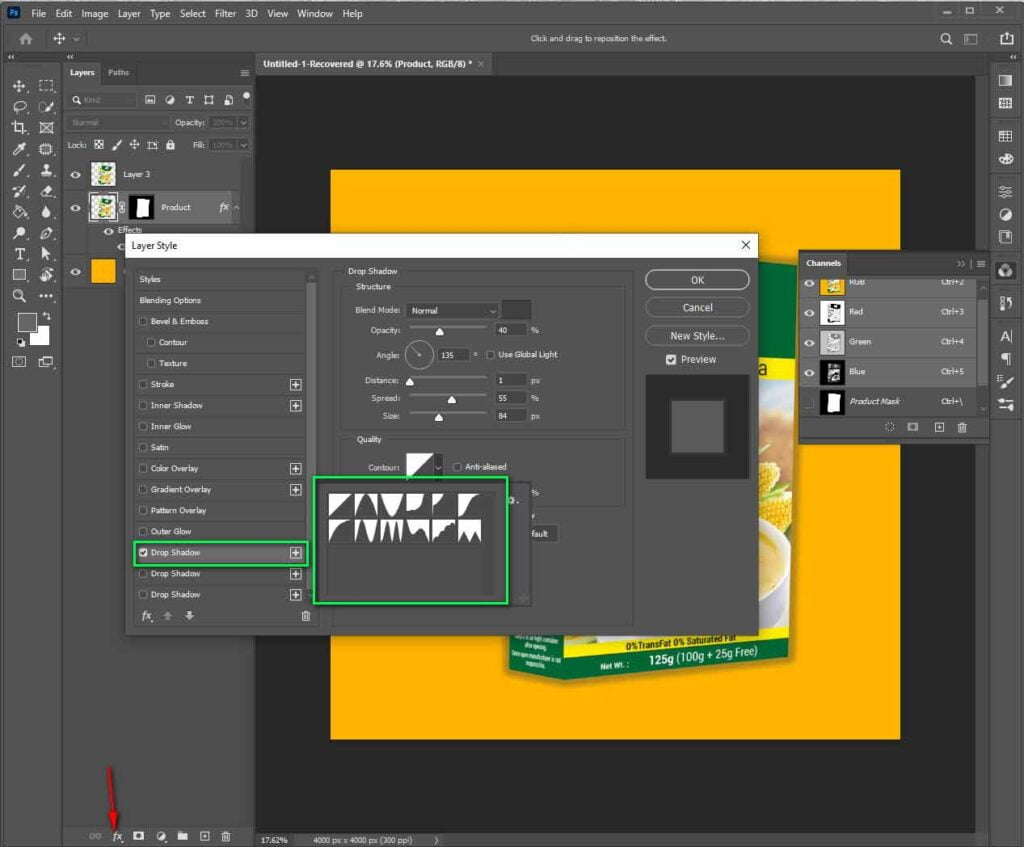
Customers can engage with a product on an emotional level by displaying it in various contexts. When you’re using Photoshop to blend the product into that environment, you’ll need to give it a realistic drop shadow to make the photo look more authentic.
While you’re showcasing a product against a white background, a realistic shadow helps your product stand out and provides a much more realistic, professional-looking image.
As an example. Furniture is good for applying the drop shadow technique. It will allow texture and depth to the product shots without having to worry about technical lighting during the shoot.
Frequently Asked Questions
Choose Drop Shadow from the fx button at the bottom of the Layers panel. A dialog box for Drop Shadow will appear. Adjust the shadow color to the same color as the foreground color to produce a drop shadow.
Choose the layer that you want to drop shadow on, then go to the Layers panel’s bottom and click the “Add a layer style” button. From the pop-up menu, choose “Drop Shadow”.
To use the ‘drop shadow’ layer style in jewelry, select the image layer first. Then go to Layer > Layer Style > Drop Shadow from the top menu. Selecting the image layer instructs Photoshop to produce a shadow depending on the image you’ve chosen.
Bottom line
In this article, we have mentioned all the valuable steps of applying natural shadow on a picture by using photoshop. So drop your concern about how to create natural shadows in photoshop. And follow those steps.
