Ways of Darken Lines in Photoshop- 3 Methods Explained

Maybe you are a photographer or designer. Because of this profession, a common thing you may have noticed is that some of the lines in your photographs may need to be darkened sometimes. However, you might not know how to accomplish this.
If you are one of them and seeking a way to darken lines in Photoshop, the following article could help you. It will assist you in learning the details of line darkening in Photoshop in a few simple steps.
Adobe Photoshop’s line-thickness tool is perfect for this. Both the line’s depth and color could be changed with this tool. If you want to know how to darken lines in Photoshop, here is a helpful guide you should read.
How to Use Levels to Make Lines Darker in Your Photographs
Contents
In Photoshop, you can easily and quickly darken lines with the “Levels Adjustment.” This allows you to adjust the photo’s shadows, mid tones and highlights to improve the photo’s contrast and bring out the sharpness of its edges and lines.
Before doing anything further, you should bring up your project in Photoshop and go to Edit > Levels. In the panel labeled “Adjustments” (represented by a graph with wavy lines), you’ll find the Levels option. Additionally, levels can be accessed using the panel’s pull-down menu.
When you click the “Layers Button,” a new window will appear on the right. Histograms are the line charts in the middle, including three arrows at the bottom that you can adjust.
Related video:
Try adjusting the balance between the light and dark areas to see if you can make the lines more distinct.
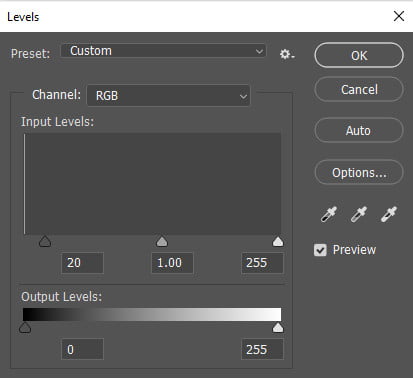
When the black and white “Input Levels” sliders are brought together in the middle, the histogram’s beginning and ending points become clear. Line art is especially useful in this context since it may be used to draw attention to certain points across a line.
Tutorial on Making Darken Lines in Photoshop

Basic way
Photoshop is useful for a wide variety of editing tasks due to its adaptability. So, it’s possible to accomplish the same task in several unique Photoshop ways. There are a variety of ways to darken lines in a photograph; choose the one that works best for you.
Some approaches are extremely useful and flexible in their use. The process you choose should always be the one that helps your concentration the most.
First, we’ll get started with the fundamentals. This is the quickest and easiest way to darken lines, especially when compared to other Photoshop approaches for darkening lines.
Step 1: First, navigate to the image you want to edit and open it in Photoshop by clicking the File menu.

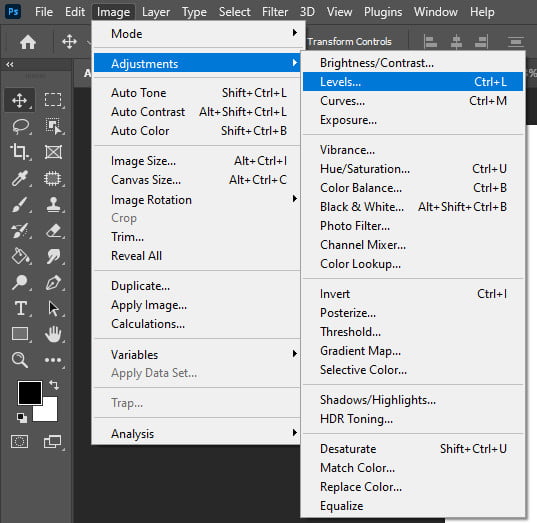
Step 2: Then, select “Image” > “Adjust” > “Levels.” When clicked, a window containing progress bars would appear.

Step 3: Next, set the appropriate input volumes in the newly opened dialogue box. The left side must be slid across to the right side. Additionally, if the right sidebar could be shifted to the left, that would be great.

If you follow these steps, your images will have more defined lines. Alternative methods should be followed, even if this method is difficult for you to make the lines darker.
Using Burn Tool
To darken lines in a photo in Photoshop, using the “Burn Tool” could be a good alternative. Sometimes, you may wish to emphasize only some of the lines in a picture. The burn function is one option for accomplishing this.

Using the Burn tool, you can shade in specific regions of an image.. This allows you a finer degree of control over the dark setting. It gets darker if you keep painting over the same spot.
To begin emphasizing a line in a photograph, choose the Burn tool from the toolbar. Pick a brush from the toolbar, and then paint over the image to make it darker. Don’t forget that when you add more to an image, it will get darker. Don’t be in a hurry; take your time.
Try Duplicate Layer
It was possible to make the lines darker by duplicating individual layers several times. Use an image editor like Photoshop to do the editing. Once that’s done, you can activate the background picture. Then, right-click the image and choose “Duplicate Layer” to make a copy.
Make two more copies of the same image. To finish, go to multiply mode for the layers. You can export the picture at a later time to get the darkened-lined image, which you can use in different projects later on.
Bottom Line
To sum up, making darkened lines in Photoshop is an essential, common step for both photographers and designers. If you want to make lines in your photos darker, Photoshop will be your best option. Photoshop gives the user a lot of ways to do this.
In this article, we’ve talked about three ways to darken a photo line. Choose the one that is easier for you. But still, you are not able to use any of these methods without help from a post-production house.


