3 Ways to unmerge layers in Photoshop

When it comes to editing pictures and making them more visual, Photoshop is a lifesaver. Photoshop has various areas of expertise, and creating layers is one of them. The use of layers is essential in a photograph when someone wants to elaborate on the photo a bit.
To do this, a designer must know how to separate layers in Photoshop. For example, in a photograph, you may have separate layers for each person, their clothing, and the background. Each of these layers can be modified separately.
Still, in some situations, you may have to merge multiple layers into one. On the other hand, you could also cancel the merger. Here are three simple approaches to help you achieve both objectives.
So, in this article, we’ll go over how to unmerge layers in Photoshop.
What Does It Mean To “Merge” Layers?
Contents
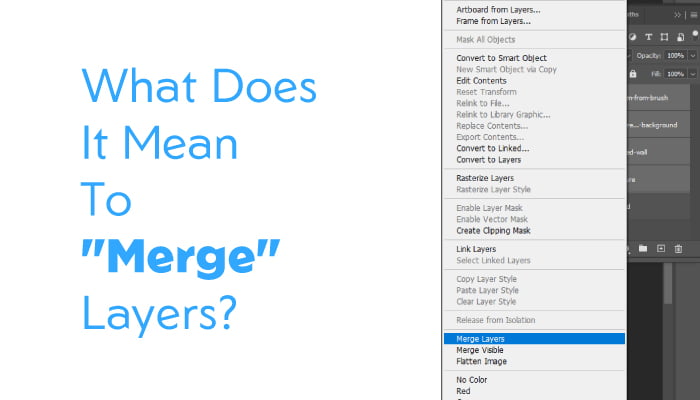
It is recommended that you familiarize yourself with the concept of a layer and know how to merge layers in Photoshop before moving on to the unmerging layers.
A layer is like a thin piece in a multi-layered picture, which can save individual parts of a picture or layout. A structure, a snippet of text, a section of another image, etc., are all examples of pictures’ components.
In Photoshop, merging layers can be done in a few different ways. One option is choosing the Layer > Merge Layers menu item and selecting the layers you want to merge. Another option is to press Ctrl + E (or, on a Mac, Cmd + E).
When you do that, all of the layers become combined into one. The order is important because when the layers are combined, the one on top will be on top, and the other will be at the bottom.
In the case of transparent layers, the default blend mode will be used to combine them. Altering the blend mode is as simple as picking a new mode from the drop-down list at the top of the Layers panel.
Layer merging is a powerful tool for creating seamless composites out of many photos or for bringing together previously unrelated sections of a single image. To achieve this, you can utilize the layer merge instructions.
since you may modify individual parts of an image in Photoshop. Therefore, adjusting the saturation of one layer and the brightness of another will have no effect on the other.
Making changes to numerous photos instantly is now possible with the help of layers and layer masks in Photoshop. Hopefully, you understood the merging layer. Now have a look at the unmerging layer.
Do Photoshop Layers Allow For Unmerging?
You may have encountered a problem and don’t know how to unmerge layers in Photoshop. The end outcome will be the same whether you smooth or merge your layers.
Because of this, it is no longer possible to change any of the layers individually. But with a few clicks in Photoshop, you can quickly undo the merge and return to your original layers.
Knowing the two primary uses for unmerging layers in Photoshop is essential. The first step is to separate the text or image layer from the image’s background.
This will allow you to work with the text or graphics layer separately or to place it over a new background. Second, there are times when jpeg photographs are sent to customers, possibly for approval, before being used in a design. They may be unable to view the layered PSD file.
When you export the PSD file as two individual jpegs, they will have all they need to approve designs.
First Approach: Apply the Undo Command
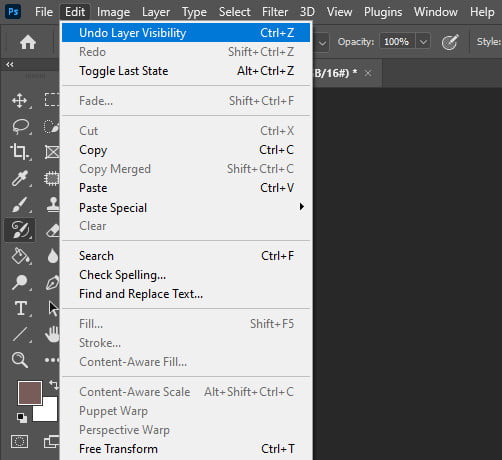
Undoing a layer merge or flatten is a quick and easy way to undo a recent change. Press Ctrl+Z (Windows) or Command+Z (Mac OS) or choose Edit > Undo.
Merge Visible to undo a recent merge of layers. If you need to undo your last action multiple times in a row, using the keyboard shortcut is far quicker than going through Edit > Undo.
Second Approach: Use the History Panel
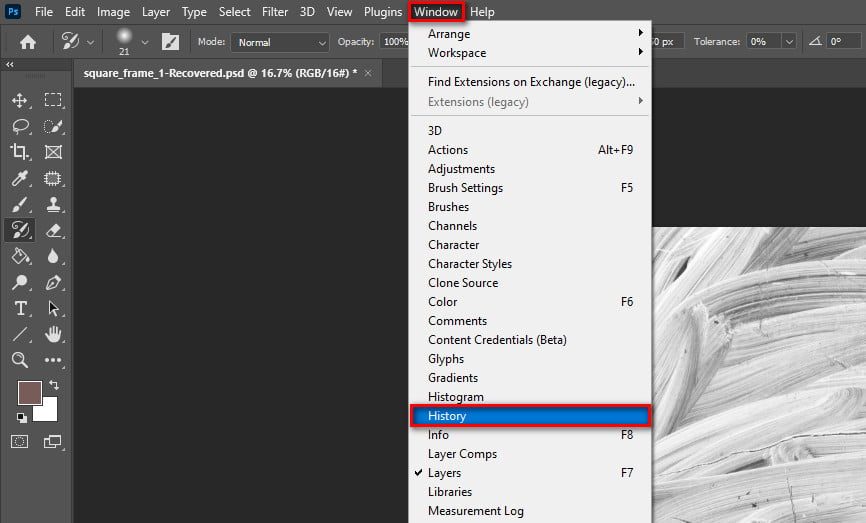
Using the History Panel is another option for unmerging layers in Photoshop. When making changes to a project, you may view its whole history in the history panel. The default setting for the history panel shows 50 different points at a time.
This allows you to go back and forth between 50 different settings with ease. If you’ve merged your layers inside that window, you may easily separate them again.
To access the History panel, select Window > History (or use the keyboard shortcut Ctrl+Alt+Z in Windows or Cmd+Option+Z in Mac OS) or click the History button (or press the History button).
All of your previous actions are recorded and displayed in the History section. As a result, it will have a record of the document in its unaltered state before you make any changes. You can go back to a previous step by clicking on it.
Select the action you were performing just before you merged your layers. The outcomes of your most recent changes can be viewed in the revisions section. Hold off merging until you get to that option in the scroll bar.
For example, if you have combined two layers with the names “Layer 1” and “Layer 2,” the history panel will show either of these events. When you click on one of these buttons, Photoshop will undo the action and put the layers back to how they were before they were combined.
In Photoshop, you can change the number of history states by going to “Edit > Preferences > Performance > History States.”
When this number rises, you’ll have additional options for reliving the past. Remember that the way the program works could change depending on what your computer can do.
How to Merge Photoshop Layers Without Destroying the Originals
Unfortunately, once you merge layers in Photoshop, you cannot undo anything. Undoing changes you wish to preserve is an annoying but common occurrence.
There are ways to merge layers without changing the files underneath, so you can avoid this problem altogether. Some viable solutions to Photoshop’s layer-merging functionality are provided below.
1. Create Smart Objects
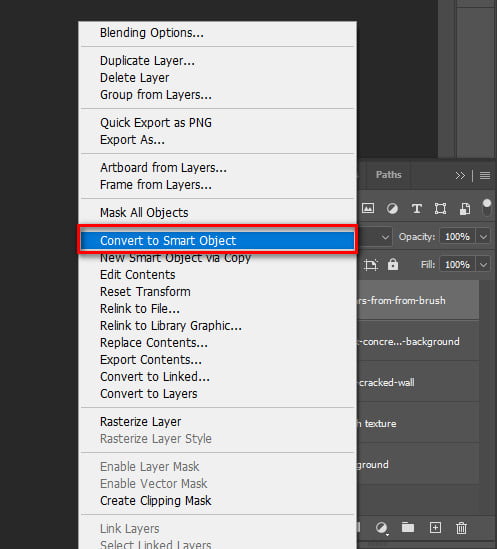
Smart objects are a great way to combine multiple layers while giving each layer access. To open these layers in versions of Photoshop before Photoshop, you had to double-click on the bright object. By doing so, you can view the project’s layers in a new tab.
Although this is essentially unchanged in Photoshop, there is a new wrinkle. With “Creative Cloud” and later, you can convert smart objects over to layers at any moment. This makes it an excellent replacement for layer merging or flattening.
Choose the layers you would like to combine before making an intelligent object. Select the layers you want to turn into smart objects, then right-click on them.
An intelligent object indicator will appear on top of each thumbnail layer, showing that all the layers have been combined. To access the bright object, double-click the layer thumbnail.
Right-clicking in Photoshop and later will also bring up the option to “convert to layers.” This will separate your layers from the bright object.
With smart objects, you don’t need to undo anything to undo the merge afterward, and they’re much simpler to work with overall.
2. Group Your Layers
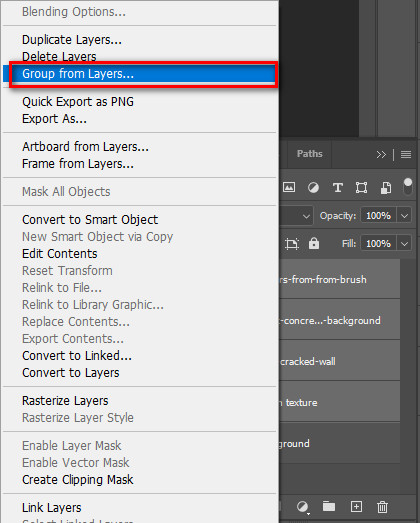
It’s recommended that you use a group instead of combining layers if you’re trying to clean up your layers panel. Layers can be grouped and then modified individually or collectively. They allow you to see more layers in your panel and make it easier to find the ones you need.
After selecting the layers you want to combine, use Command + G (Mac) or Control + G (Windows) to create a new group (PC).
3. Merge Layers Into A New Layer
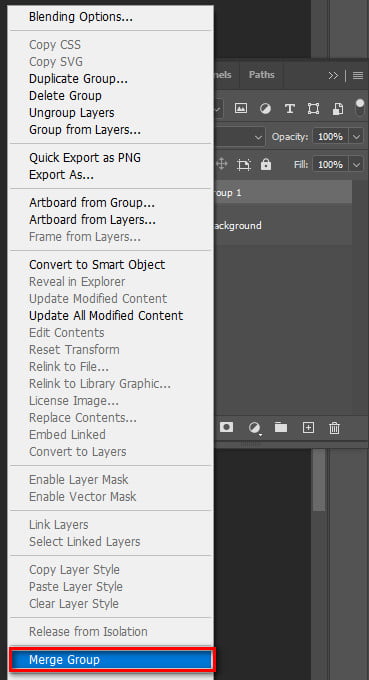
We recommend starting a new layer if you must merge layers. In this approach, the original layers can be restored at any time.
Click the eyeball icons next to the layers you don’t want to merge before you use the shortcut below. This will keep those layers from being merged by accident. You should only see the eyeball icons next to the layers you want to merge.
By pressing Command (Mac) or Control (Windows) + Option (Shift) + E (PC), you can merge and copy layers. Every currently viewable layer will be copied and combined. You can now use the merged layer and keep the original layers as a backup.
FAQ
How to Unmerge all layers?
You can easily undo any recent layer merges by using the undo function. It’s easy to undo your work by pressing Command + Z (Mac) or Control + Z (PC). The alternative is to select Edit > Undo. To easily undo many changes, use the keyboard shortcut.
How do you separate layers?
Choose “New Group” from the “Layer” menu to create a new layer group. You can add layers to the new group that is created. Just add the layers you want to the group by dragging and dropping them there. After that, you can manipulate each layer separately.
End Note
If you need to separate layers in Adobe Photoshop for any reason, this short tutorial might help. Even if the concept of layers is foreign to you, you will eventually master it. In general, the more you practice, the better you’ll get.
This brief guide on how to unmerge layers in Photoshop was helpful. You should now be familiar with Photoshop’s unmerge layer function. But still, if you face any problems, take help from a post-production house.


